Tools Needed: tape
For girls that need a nice and simple manicure, what is more classic than a French Manicure? Bonus: On the weekend you can easily change the design to a color blocking manicure with the help of some tape and a pop of color!
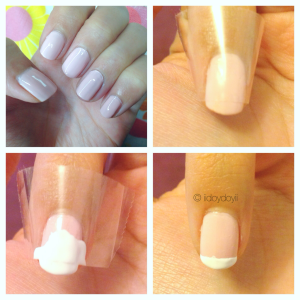
Here is a step-by-step tutorial on the French Manicure:
1. Start with a base coat to protect your natural nail bed.
2. Paint the entire nail with your base color until it is opaque.
3. With a piece of tape, line it up with the edge of your nail, leaving about a centimeter of space.
4. Paint over the tape and nail with white nail polish.
5. Immediately remove the tape for best results.
Color Blocking Nails:
6. With tape, use the same method as step 3, but feel free to do your own placement and designs. I liked layering, going horizontal or vertical, sometimes diagonal.
7. Once the manicure is done, seal the nail art design with a quick drying top coat. This will make the nail look shiny and the design last longer.
I hope you enjoyed this transition from prim and proper to a fun and modern manicure!
List of Products:
Butter London Nail Foundation Flawless Base Coat
Butter London Hardwear P.D. Quick Top Coat
OPI Alpine Snow
China Glaze Re-fresh Mint
Deborah Lippmann Marnie, Prim and Proper
I’d love to see your manicure. If you end up trying this nail look out, show/tag me on Instagram using the hashtag #iidoydoyii


Aww! That’s pretty! 😍 and I love the colors you used.
LikeLike
Thank you so much! I’m glad you like it as much as I do 🙂
LikeLike
Super pretty!
LikeLike
Thank you Lauren!
LikeLiked by 1 person
No bother 🙂
LikeLiked by 1 person
That looks really modern and chic! So pretty:)
LikeLike
Thank you for stopping by!
LikeLiked by 1 person
I love it! 🙂
LikeLike
Thank you so much!
LikeLiked by 1 person
I love this one! So 60s mod.
LikeLiked by 1 person
I’m glad you like it! 🙂 I didn’t think of it that way, but I totally see what you’re saying.
LikeLike
This is very lovely! I love these colors, great for office look too 🙂
LikeLike
Thank you! I was trying to go for a manicure that isn’t as wild or loud as my others ones for girls that need it to be simple during the week and spice it up on the weekends haha so thank you for noticing!
LikeLiked by 1 person
This is beautiful!!
LikeLike
Thank you so much! 🙂
LikeLike
I LOVE THIS SO MUCH! Kind of has a retro feel to it!!!!!
LikeLiked by 1 person
Thank you!!!! It does. Doesn’t it?!
LikeLiked by 1 person
It really does! I love it! Great color selection, as well! Loving pastels lately! ❤
LikeLike
Pastels are SO SO pretty. I cannot get enough of them!!!!
LikeLiked by 1 person
This is soo beautiful, thank you for sharing 🙂
LikeLiked by 1 person
Of course and Thank you! 🙂
LikeLiked by 1 person
i wish my nails were long enough to try this, it’s so cute!
LikeLike
Grow them out if you can! It’s really easy to paint this one 🙂
LikeLike
This looks amazing 😃… Loved the pastels
LikeLiked by 1 person
Thank you! Pastels are gorg.
LikeLiked by 1 person
Totally 😍
LikeLiked by 1 person
I like the subtle colour combo of this look – very 1960’s mod.
LikeLiked by 1 person
Thanks! I gotta throw some neutrals in there once in a while, but of course, I had to change it and make it more fun in the end. I can’t help myself.
LikeLiked by 1 person
How are you so amazing?!
LikeLiked by 1 person
Umm you’re way too sweet!
LikeLiked by 1 person
Yeah right!!! I’m honest! Your soooooooo talented! 🙂
LikeLiked by 1 person
Thank you very much! I appreciate it ❤
LikeLiked by 1 person
Pingback: August Favorites | 2015 | Styled with Joy
Pingback: Manicure Monday: The New French Manicure Series | Styled with Joy
Pingback: Manicure Monday: The New French Manicure Series | Styled with Joy
Pingback: Manicure Monday: The New French Manicure Series | Styled with Joy
Pingback: My Favorite Styled with Joy Blog Posts | Aug. 2015 | Styled with Joy