Tools Needed: Dotting tool
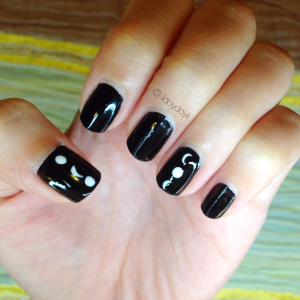
My friend encouraged me to do a moon manicure and here is my take on it! Simplicity at its finest, all you need is black and white to achieve this nail look. Let’s get started!
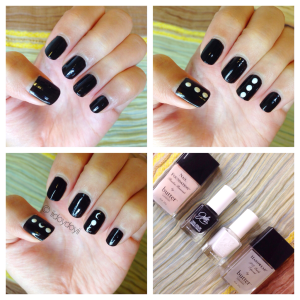
Here is a step-by-step tutorial on the Moons Manicure:
1. Start with a base coat to protect your natural nail bed.
2. Paint nails black until they are opaque.
Moons time!
3. With the white polish, make three dots on your accent nails (thumb and ring finger.)
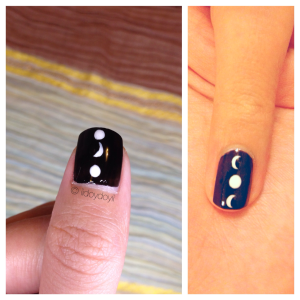
4. With your dotting tool, dot on two black dots on half of the white circle. You can alternate full moons and half moons.
Here is a close up of my accent nails:
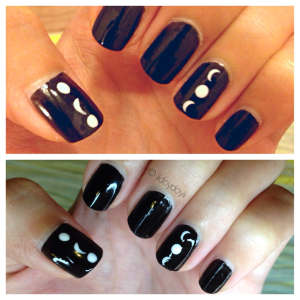
I had to shoot in different lighting because the bright white light distorted the white moons. Here you can see all the moons I’ve created:
5. Once the manicure is done, seal the nail art design with a quick drying top coat. This will make the nail look shiny and the design last longer.
This moon manicure can be worn any time of year to make any look edgy. If it’s too edgy, you can use this manicure during Halloween!
List of Products:
Butter London Nail Foundation Flawless Base Coat
Butter London Hardwear P.D. Quick Top Coat
Julie G White Orchid
Julie G Black Sheep
I’d love to see your manicure. If you end up trying this nail look out, show/tag me on Instagram using the hashtag #iidoydoyii


Oh my, so nice! Really love this one.
LikeLike
Thank you! I’m not much of a black polish wearer, as you know, so doing designs like these take me out of my comfort zone.
LikeLiked by 2 people
Well, it looks faboo!
LikeLike
Faboo! Thank you! (Rhymed)
LikeLiked by 1 person
Super cute 🙂
LikeLike
Thank you 🙂
LikeLiked by 1 person
No bother 🙂
LikeLiked by 1 person
I like your take on a moon design – most people would have done an obvious one.
Do you take requests? Can you do a plaid design in Fall colours? 🙂
LikeLike
Thank you girl!
And of course I take requests. I encourage them! I’ve never done plaid before, but I will try it for Fall 🙂 *adding to my list*
LikeLiked by 1 person
OMG – I love this! So biting this!! Haha!
LikeLike
Thank you. Go for it!
LikeLiked by 1 person
Cool 🙂 Love it! Simple yet really striking!
LikeLiked by 1 person
Thank you so much!
LikeLiked by 1 person
Your manicures look so perfect with no bubbles whatsoever! What’s your mani secrets/process? I look forward to every mani Monday by you.
x
LikeLiked by 1 person
Thank you! I’m so happy you enjoy my mani Monday posts! I have a post on how I take care of my nails, but here’s my base coat/top coat post. That’s my secret –And thin coats too. https://styledwithjoy.wordpress.com/2015/02/15/base-coat-and-top-coat/
LikeLike
I love this!! Reminds me of Eluphant’s “Man on the Moon” album…💕🌙
LikeLike
Thank you! I’ll check it out!
LikeLiked by 1 person
“SimSim” and “Flower” are my favorite songs!
LikeLiked by 1 person
I love black and the moons look amazing! Have a wonderful week!
xo, Bry
PokerNight.Naughty&Nice
LikeLike
Thanks for stopping by!
LikeLike
its so cute
LikeLike
Thank you!
LikeLiked by 1 person