Tools Needed: Dotting tool
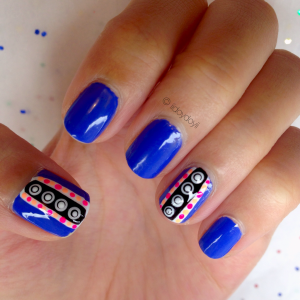
My inspo came from a tribal looking nail art design and I decided to make it come to life by using polka dots.
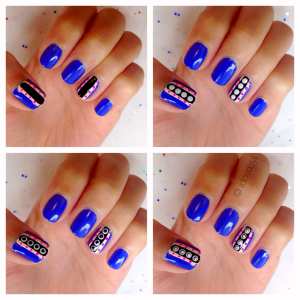
Here is a step-by-step tutorial on the 3D Polka Dot Accent nails:
1. Start with a base coat to protect your natural nail bed.
2. Paint nails blue until they are opaque.
Stripes
3. Paint a thick white stripe down the middle of your nail.
4. Paint a thinner black stripe in the middle of the white stripe.
5. With a bright orange polish, space out dots on all the white areas.
6. With a bright pink polish, alternate with the orange dots.
7. Paint 4 large dots onto the black area.
8. Paint 4 medium black dots onto white dots.
9. Paint 4 small white dots onto black dots. You should be left with a 3D effect!
10. Once the manicure is done, seal the nail art design with a quick drying top coat. This will make the nail look shiny and the design last longer.
I like how complicated the design looks, but it’s really easy when it’s broken down into polka dots.
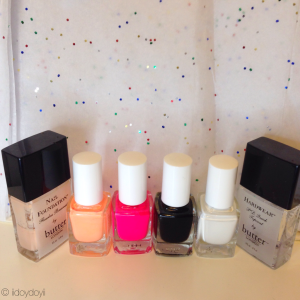
List of Products:
Butter London Nail Foundation Flawless Base Coat
Butter London Hardwear P.D. Quick Top Coat
Julie G White Orchid
Julie G Black Sheep
Julie G Cabana Boy
Julie G 9 to 5
Julie G Oh Em Gee!
I’d love to see your manicure. If you end up trying this nail look out, show/tag me on Instagram using the hashtag #iidoydoyii


Pretty
LikeLike
Thank you!
LikeLiked by 1 person
Very cool!
LikeLike
Thank you!
LikeLiked by 1 person
Love it!
LikeLike
Thank you so much!
LikeLiked by 1 person
Omg seriously?!!?!? AMAZING!
LikeLiked by 1 person
Thank you so much girl! 🙂
LikeLiked by 1 person
Those dots looked like decals! I have to enlarge the photo to double check! You crazy chick.
LikeLiked by 1 person
That’s like one of the best nail art compliments — it’s similar to “are your nails fake?” bc they’re long/healthy. Lol so thank you 🙂
LikeLike
i”m so down to recreate this look! love it!
LikeLike
If you do, tag me on instagram so I can see it💅🏼
LikeLike
Very cute many! I like it
LikeLike
Thank you Alessia!
LikeLike
so cute dear.
LikeLike
Thank you lovely!
LikeLiked by 1 person
so cute!!
LikeLike
Thank you!!
LikeLiked by 1 person
Pingback: My Favorite Styled with Joy Blog Posts | Aug. 2015 | Styled with Joy