Tools Needed: Dotting tool
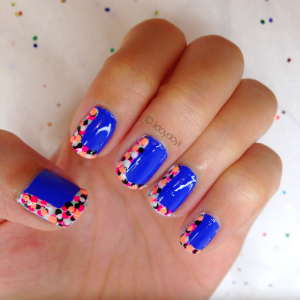
I was wondering what I should make my birthday manicure and confetti sprung to mind. I knew my outfit would be orange, so I decided to complement instead of match orange and used blue as a base. Confetti is all sorts of colors, so feel free to use what you have. Let’s get started!
Here is a step-by-step tutorial on the Confetti nails:
1. Start with a base coat to protect your natural nail bed.
2. Paint nails blue until they are opaque.
3. With the white polish, make a line on the tip of your nail. It does not have to be perfect.
4. Connecting to the white, on the side of the nail make a curving motion with white polish.
5. Now dot on every different color you have including black and white. Have fun with it!
Just make sure to let the nails dry after each color or they will blend together and form a blob of a mess. I made sure to use orange because orange and blue are complementary colors.

5. Once the manicure is done, seal the nail art design with a quick drying top coat. This will make the nail look shiny and the design last longer.
Confetti nails are cute, fun and great for celebrating!
List of Products:
Butter London Nail Foundation Flawless Base Coat
Butter London Hardwear P.D. Quick Top Coat
Julie G White Orchid
Julie G Black Sheep
Julie G Cabana Boy
Revlon Minted
Julie G Oh Em Gee!
Julie G 9 to 5
I’d love to see your manicure. If you end up trying this nail look out, show/tag me on Instagram using the hashtag #iidoydoyii


Those are the cutest! Beautiful nails, you are the best at manicures. I’ll have to try this. 🙂
LikeLiked by 1 person
Thank you so much! Please do and let me know how it turns out 🙂
LikeLike
No problem, and I will soon! I’m thinking some fall colours.
LikeLike
I can’t wait to do fall manicures. I think I should get more hunter green nail polishes.
LikeLike
I have I-rush Luck by Sally Hansen Insta dry, it’s more of a Christmas green but great for most green things! I love fall manis, my favourite colour is probably Bahama Mama by Essie. It’s a really pretty dark plum.
LikeLike
I have Bahama Mama! I’ll make sure to use it in an upcoming nail tutorial for you 🙂 I do need to stop the bubbly summertime manicures, but I can’t help myself — they’re my favorite. Also, fall is just around the corner so it’s still summertime here! few more days left!
LikeLike
Well, Im going to go ahead to bed, so if I don’t reply… I’m sleeping. Haha. Bye!
LikeLike
Aw you’re so sweet to warn me. No worries!
LikeLike
This blue base polish is sooooo pretty! (I may have made the same comment on a previous post where you had this colour). But seriously, it is SO beautiful!
LikeLiked by 1 person
Haha no worries. I think the same thing! It’s probably why I keep using it this summer 🙂
LikeLiked by 1 person
I love the colors you’ve used! Really pretty but really simple 🙂 Could you look at some of my work? I haven’t got much but I’d appreciate other peoples’ opinions
LikeLike
Thank you for stopping by! I like your designs because they are simple for anyone to follow. I actually have yet to do 3d nail art — do more of that if you can. It will make you stand out.
LikeLike
That looks so cute and fun!
You are so creative with your nails and you make it look so easy as well 🙂
LikeLiked by 1 person
Thank you! I try to be as creative as possible while making it easy in the step by step. I never want the nails to look intimidating to do!
LikeLiked by 1 person
Cute! Like frosting and sprinkles on a birthday cake 😀
LikeLiked by 1 person
Celebration nails! Hehe
LikeLiked by 1 person
Happy birthday Joy!!!! Love this mani ❤
LikeLiked by 1 person
Thank you! It’s a fun mani for sure 🙂
LikeLiked by 1 person
I love this….your manicures are just fantastic😍😍
LikeLiked by 1 person
Thanks girl! 🙂
LikeLiked by 1 person
So cute! Hope you enjoyed your birthday celebrations.
LikeLike
Thanks for stopping by and for the greetings!
LikeLiked by 1 person
Pingback: My Favorite Styled with Joy Blog Posts | Sept. 2015 | Styled with Joy