Tools Needed: dotting tool, liner brush
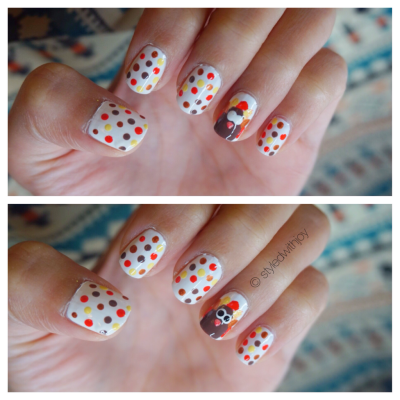
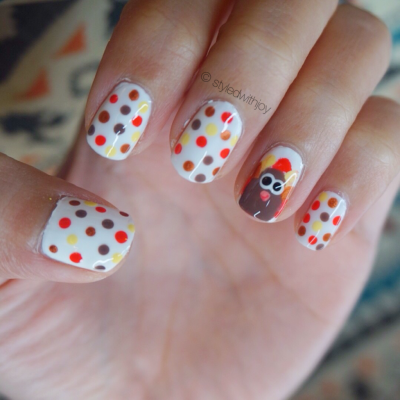
I’m very happy with how this little turkey guy came out so let’s jump right in!
Here is a step-by-step tutorial on the Turkey nails:
 1. Paint nails white until they are opaque.
2. Leaving the ring finger blank, paint on red, orange, brown and yellow dots in any pattern on the rest of the fingernails.
3A. With a liner brush, paint one red line from the middle of the nail down.
3B. Also, paint diagonal lines on the sides of the straight line.
3C. Repeat Step 3B with yellow and orange as well. Let dry.
 4A. In the middle of the nail, with a brown polish, make a circle for the head followed by a larger circle underneath for its chubby belly.
4B. Add white dots and an orange beak/triangle underneath the white dots.
4C. With black polish, top of white dots with smaller black dots for eyes.
5. Finish the nail design with a fast drying top coat to make it shiny and last longer!
There are so many variations of this Turkey Manicure. You can do solid colors or stripes instead of polka dots; You can leave all the nails white and have a turkey accent nail. It’s really up to you! Gobble, gobble!
List of Products:
Butter London Nail Foundation Flawless Base Coat
Seche Vite
Julie G White Orchid
ORLY Lemonade
Julie G Black Sheep
Julie G Sound the Alarm
Essie Hot Coco
Milani Bijou Bronze
I’d love to see your manicure. If you end up trying this nail look out, show/tag me on Instagram using the hashtag #styledwithjoy
How will you do your nails for Thanksgiving?

Too cute! Love the turkey accent nail (very appropriate, not just some random nail that’s different from the rest!) 🦃
LikeLiked by 1 person
A stashmatters approved accent nail!
LikeLiked by 1 person
Yes! 😛
LikeLiked by 1 person
That turkey that you did is too cute! Love it!
Xo, Christianne
http://simplychristianne.com
LikeLiked by 1 person
Aww thank you. I did that turkey so, so carefully. Maybe I wasn’t breathing during the process!
LikeLike
so cute!!! i’m left hand challenged so i could never do my nails like this haha!
LikeLike
Thank you! I have trouble doing the opposite hand too!
LikeLiked by 1 person
Super cute!!! 🙂
LikeLike
Thank you so much!
LikeLiked by 1 person
The little turkey is too cute!
LikeLiked by 1 person
Thank you! It’s his eyes. Lol
LikeLiked by 1 person
So cute!
LikeLike
Thank you!
LikeLiked by 1 person
So cute! I like the color scheme! Perfect for this week 🙂
Amy | http://amypham.me
LikeLiked by 1 person
Thank you! I just thought of festive colors for the holiday and I’m glad they worked well together. 🙂
LikeLike
Awww this is so cute, and I love the turkey accent!
LikeLiked by 1 person
Thank you! It’s nice to look down and see that cute little turkey 🦃
LikeLiked by 1 person
Wow these are so awesome!!! I love the little turkey accent nail 😀 You’re so talented!
LikeLiked by 1 person
Thank you so much for your lovely comment!
LikeLike
so cute 🙂
LikeLiked by 1 person
Thank you!
LikeLiked by 1 person
Pingback: My Favorite Styled with Joy Blog Posts | Nov. 2015 | Styled with Joy