Tools Needed: tape and scissors
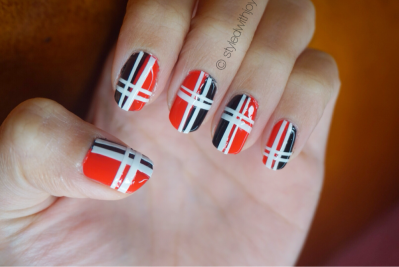
This is the first time I have ever used this method and I think it’s pretty awesome. Plaid nails were requested by StashMatters for the Fall, so let’s get started!
Here is a step-by-step tutorial on the Plaid nails:
1. Start with a base coat to protect your natural nail bed.
2. Paint a few inches of tape with white nail polish. Cut up thin strips – this does not need to be all the same sizes.
3. By using tape as a guide, paint half of the nail black until opaque.
4. Remove the tape and paint the other half of the nail red until opaque.

5A. Start applying the white stripes on either the red or black side with two stripes going down.
5B. Repeat 5A but with the stripes going across.
6. Seal the design with a quick drying top coat to protect the tape and make the design last longer.
I love getting nail requests, especially when I have never done them before, because it only pushes me to get out of my comfort zone. Keep ’em coming!
List of Products:
OPI Base Coat
Seche Vite
Julie G Black Sheep
Julie G White Orchid
Julie G Sound the Alarm
I’d love to see your manicure. If you end up trying this nail look out, show/tag me on Instagram using the hashtag #styledwithjoy


Love this one. You are very artistic!
Xo,Christianne
http://simplychristianne.com
LikeLike
Thank you Christianne! That means a lot!
LikeLike
Super cute. You are so talented. Like, seriously. I can’t do that stuff to my nails!
LikeLiked by 1 person
Thank you so much! Your comment made my day. You’re too sweet 🙂
LikeLiked by 1 person
I speak the truth friend!!! ❤
LikeLiked by 1 person
😘❤️
LikeLike
So beautiful
Unfortunately we, boys do not have such stuffs.
LikeLiked by 1 person
Thank you for stopping by! 🙂
LikeLiked by 1 person
My pleasure!:)
LikeLiked by 1 person
So adorable! Nicely done.
LikeLike
Thank you so much! 🙂
LikeLike
So festive without being obvious. So neat too. ❤
LikeLiked by 1 person
Thank you! You’re the inspo behind these nails so thanks for your nail request 🙂
LikeLiked by 1 person
Yay! Ask and ye shall receive! 😀
Next request: snowflake nails. 🙂
LikeLiked by 1 person
Great! Adding it to my list. I have done snowflake nails before (pre blogging life) so it will be fun to revisit the fun design!
LikeLiked by 1 person
These are seriously so perfect! I love plaid!
LikeLiked by 1 person
Thank you so much Laurel! Plaid is so fall appropriate dontcha think?
LikeLike
Omg! 100%! Perfect for fall and so perfect for the holiday season!!!!
LikeLiked by 1 person
Yay! Since it’s almost December, I’ll try for more festive nail looks 🙂
LikeLiked by 1 person
I love this! It looks so cute and I’ll have to try it soon. I have super short nails so it’ll be quite a feat, but I think I can pull it off.
Please do more holiday nails, you are very talented with polish!
Mali
LikeLiked by 1 person
Thank you! I hope you do try it and if you do, let me know. It doesn’t matter how long or short your nails are – you can do it. I am trying to do more holiday nails this month! Thank you for the encouragement 🙂
LikeLike
Love love love ❤❤❤
LikeLiked by 1 person
Thank you Lauren! 🙂
LikeLiked by 1 person
Superb nail art… 🙂
LikeLiked by 1 person
Thank you so much! 🙂
LikeLiked by 1 person
So cute!
LikeLiked by 1 person
Thank you! 🙂
LikeLiked by 1 person
Pingback: My Favorite Styled with Joy Blog Posts | Nov. 2015 | Styled with Joy